
 Questa è veramente una bella idea, e costa decisamente poco.
Ho trovato questo progetto e me ne sono innamorata subito, ho chiesto a Mr M, mio marito, di dedicarcisi appena può!
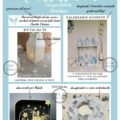
La creazione di questa libreria fai da te è semplice come costruire una scatola. Basta seguire questi semplici passi per creare una libreria con le dimensioni che vuoi:
Di che cosa hai bisogno
elementi da archivio di recupero, che sono la base su cui costruire il mobile
pannelli di fibra a media densità (MDF) spessore 1 cm : nei grandi centri del fai da te (tipo Leroy Merlin, Brico, Self…) ci sono scatoloni di ritagli di varie dimensioni che costano praticamente niente, quando pensi a che dimensioni fare, magari buttaci un occhio!
sega
trapano
carta vetro
colla per legno
morsetti
viti
pasta di legno
primer e vernice, pennello.
1.
Cerca nei mercatini, in soffitta, nei negozi dell’usato cesti, cestini, ciotole, cassetti, scatole e perfino valigie. Potrai utilizzarli per determinare la dimensione delle caselle di costruire. Scegli coppie o trii che sono uguali o simili in altezza in modo da avere delle linee parallele nelle finestre.
2.
Misura ogni pezzo di archivio (cesti, cassetti, scatole) per determinare la dimensione della finestra, lasciando un piccolo spazio affinchè si adatti facilmente all’interno. Considera quante finestre vuoi e quale vuoi che sia l’ingombro finito della libreria, quante finestre vuoi e quanti pieni e vuoti pensi ti servano.
A lavoro finito, pià ci saranno fiestre di diverse dimensioni più la libreria sarà bella e interessante!
Fai solo attenzione che tutte le finestre abbiano la stessa profondità in modo che la libreria si trovi a filo contro il muro.
3.
Per costruire una finestra, utilizzare una sega circolare per tagliare l’MDF delle dimensioni desiderate. Occhio che lati opposti dovrebbero avere le stesse misurazioni.
4.
Montare le parti insieme, coprire le fughe con colla per legno, e fissare insieme. Quando la colla è asciutta, rimuovere i morsetti e inserire viti lungo la lunghezza delle articolazioni. Coprire le teste delle viti con stucco per legno. Usa la cartavetro per rimuovere l’eccesso, dai una mano di primer e poi di vernice.
5.
Ripetere il processo per fare il numero desiderato di caselle nei formati che ti servono.
Quando le caselle sono finite, impilare insieme per formare la vostra libreria e fissarli con qualche vite, stuccando e ripassando con la vernice se necessario.
L’effetto finale è di sicuro effetto!
Ho provato a calcolare il prezzo per una libreria di 50 cm di larghezza, 25 di profondità e 150 di altezza. Serviranno circa 4 o 5 mq di mdf spessore 1 cm che costa circa 6,00 €/mq totale € 30,00
Poi serviranno primer, colla e vernice e diciamo che tra tutto ce la dovremmo cavare con circa €20,00.
Cesti, cestini, raccoglitori sono di recupero, volendo si potrebbero verniciare con una tonalità a contrasto o in nuanche con quella della struttura, ma non è indispensabile.
Il costo totale della libreria dovrebbe essere di circa € 50,00, sfido a trovare soluzioni altrettanto cosy a questo prezzo!
This is a really nice idea, and it costs very little.
I found this project and I fell in love immediately, I asked Mr. M, my husband, of Dedicarcisi just can not!
The creation of this library DIY is as simple as building a box. Just follow these simple steps to create a library with the size you want:
What do you need
elements from the recovery archives, which are the basis on which to build mobile
Medium density fibreboard (MDF), thickness 1 cm in the major centers of DIY (type Leroy Merlin, Brico, Self …) there are boxes of clippings of various sizes that cost practically nothing, when you think about what size do, maybe throw us an eye!
saw
drill
sandpaper
wood glue
terminals
screws
wood pulp
primer and paint brush.
1.
Search in flea markets, in the attic, at thrift shops baskets, baskets, bowls, trays, boxes and even suitcases. You can use them to determine the size of the boxes to build. Choose pairs or trios which are equal or similar in height so as to have parallel lines in the windows.
2.
Measure each piece of archive (baskets, drawers, boxes) to determine the size of the window, leaving a little space so that it fits easily inside. Consider how many windows you want and how you want it done the bulk of the library, how many windows you want and how many full and empty you think you need them.
When completed, there will be pià fiestre of different sizes plus the library will be beautiful and interesting!
Just make sure that all windows have the same depth so that the library lies flush against the wall.
3.
To build a window, use a circular saw to cut the MDF to the size you want. Eye on opposite sides should have the same measurements.
4.
Fit the pieces together, cover the joints with wood glue, and fasten together. When the glue is dry, remove the clamps and insert screws along the length of the joints. Cover the screw heads with wood putty. Use the sandpaper to remove the excess, by a coat of primer and then paint.
5.
Repeat the process to make the desired number of boxes in the sizes you need.
When the boxes are finished, stack them together to form your library and fix them with a few screws, caulking and rehearsing with the paint if necessary.
The final effect is of great effect!
I tried to calculate the price for a library of 50 cm wide, 25 deep and 150 high. It will take about 4 or 5 square meters of MDF thickness 1 cm which costs about 6.00 € / sq m total € 30.00
Then serve primer, glue and paint and say that between us all we should get away with the approximately € 20,00.
Baskets, baskets, bins are recycled, wishing you could paint with a contrasting shade or in nuanche with that of the structure, but is not essential.
The total cost of the library should be about € 50.00, I challenge you to find solutions equally cozy at this price!
credits: bhg


No Comments